ChartTrader
In this article, we will show you how to access ChartTrader, create an order, configure the tool to suit your trading style, and adjust or cancel trades directly from the chart.
Access the ChartTrader
- Log in to the Trader Workstation (TWS). If you haven’t installed the TWS yet, you can do it here.
- Open a chart by clicking on the Chart Icon in the top left-hand corner of the TWS.
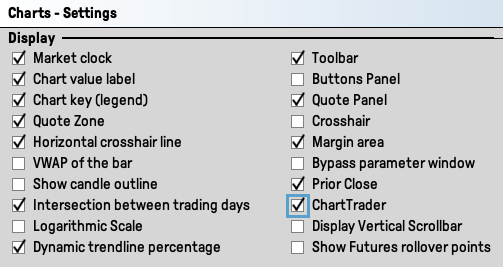
- Click on Edit in the top-left corner of the chart and then select the Global Chart Configuration feature. Select Charts > Settings on the left side. Enable the ChartTrader option by checking the corresponding box on the right side in the Display section. Click on OK to confirm.
Create an Order with Default Settings
In this section, we will show you step by step how to create an order in ChartTrader using default settings and Hot Buttons.
- Open a chart and navigate to Edit in the top-left corner and select Global Chart Configuration.
- In the Display section on the right side check the Buttons Panel box, and click Apply and OK to add the Buttons Panel to your layout.
- Alternatively, from the chart menu in the top-left corner, select View > Hot Buttons. Here, you can either hide the Hot Buttons or add them directly to the Chart Frame.

- Within the Buttons Panel, click on the Buy or Sell buttons to create an order. A dashed blue line will appear, indicating a potential entry point. Adjust the entry price by hovering and dragging the blue buy line.
Note: If there is no blue line, you likely have a MKT order selected as a preset. To change this, go to Edit > Global Chart Configuration, select ChartTrader on the left side, then Buttons, and click on Use Defaults on the right side. Confirm by clicking Apply and OK. - Position the blue line near or away from the trading price. Left-click to finalize order placement; the blue dotted line will turn solid.
- Transmit (T) and Cancel (CXL) buttons appear next to the line. Click Cancel to remove unwanted orders.
- To execute the order, click Transmit on the left of the buy line or use the Transmit button in the Orders Panel.
- Review the details in the Order Confirmation window and click Transmit to execute.
Modify Your Order
You can modify your order within the ChartTrader using two methods:
- Orders Panel: Adjust parameters like limit price, quantity, order type, or time in force directly within the Orders Panel. Left click on the corresponding column to change parameters.
- Chart Interaction: Right-click the order line in the chart. Choose Modify > Order Ticket from the ensuing menu to make adjustments within the order ticket.
After modifying, finalize the process by selecting Preview, Accept, or Transmit to promptly update your order.

Attach Orders
You can attach orders by right-clicking the blue line in the chart and choosing the Attach menu. Additional lines will be added to the chart. Drag the lines to adjust the LMT and STP prices or use the Orders Panel to make changes before transmitting.
Note: Bracket orders activate after parent order fills.
Further Settings
Once you are comfortable with ChartTrader, you can explore advanced configuration features to enhance your charts.
- Go to Edit in the top left-hand corner of your chart.
- Select Global Chart Configuration.
- Click on Charts > ChartTrader on the right side of the menu. This opens the settings hub where you can customize various parameters.
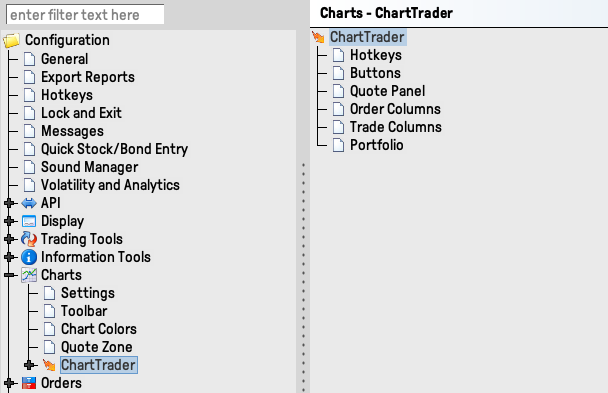
- Hotkeys: Configure keyboard and mouse shortcuts for efficient navigation. Check the available and activated shortcuts in the section Configured Shortcuts.
- Buttons: Activate the buttons panel on the chart and customize it by adding or editing buttons. For example, the blue Buy button lets you set an entry price line using the mouse.
- Quote Panel: Adjust quote panel column headers and colors. Add Unrealized P&L by clicking Apply. Enable it under the View menu if not visible.
- Order Columns and Trade Columns: Customize columns by adding new ones or removing the ones you do not need anymore. For instance, add the Filled column by clicking apply.
- Portfolio: Add and remove columns for your current positions within the Portfolio Panel.
FAQ
All product groups are available for trading within the ChartTrader.
Although subscribing to real-time market data is not required, it can enhance your trading experience in ChartTrader.
For instructions on how to request real-time market data, click here.
The SMART charting examines and compares market data from different trading venues for a contract, showing the most advantageous quotes.
To use SMART charts effectively in your trading strategy, you need to have real-time market data subscriptions for all exchanges where your financial instruments are traded. For instructions on how to request real-time market data, click here.
To visually represent market data from a specific exchange, use a Directed Chart. Typically, the primary marketplace for a product offers the highest liquidity and trading volume, resulting in the most favorable quotes. By subscribing to the market data for that particular exchange, the resulting Directed Chart will be fully populated with up-to-date information and will refresh automatically.
- Type the contract symbol in a watchlist and press Enter.
- If the item Stock (Directed) is not visible in the contract selection menu, click the small down arrow at the bottom to reveal hidden menu items, and then select it.
- The Exchange selection screen will appear. Choose either the main exchange for the product or the exchange for which you have an activated real-time market data subscription. After making your selection, click OK.
- A new Directed Ticker line will appear in your watchlist. It will display the contract symbol followed by the chosen exchange, preceded by the @ sign. Now right-click on this directed ticker line and choose Chart > New Chart.
- A chart will be displayed. On the left side of the toolbar, after the contract symbol, you will see the Exchange you selected with the @ sign. This sign indicates that this is a Directed Chart.